how to use Jquery data table with php and mysql

how to use Jquery data table with php and mysql???

The following code will display your mysql data in the Jquery datatable plugin which will have search option and sorting pagination in default. And also it is a client side scripting so it will work faster. you can export your table data’s in PDF excel using the same plugin.

In the below code replace your mysql password, your table name and column name. Download the other required file here.

Code:

<html>
<head>
<link rel=”stylesheet” type=”text/css” href=”http://ajax.aspnetcdn.com/ajax/jquery.dataTables/1.9.4/css/jquery.dataTables.css”&gt;
<style type=”text/css” title=”currentStyle”>
@import “media/css/demo_page.css”; @import “/media/css/header.css”;
@import “media/css/demo_table_jui.css”;
@import “media/css/jquery-ui-1.8.4.custom.css”;
@import “media/css/TableTools_JUI.css”;
</style>
</head>

<body>
<?php
$con=mysqli_connect(“localhost”,”root”,”password”,”databasename”);
if (mysqli_connect_errno())
{
echo “Failed to connect to MySQL: ” . mysqli_connect_error();
}
?>
<div></div>
<table id=”example”>
<thead>
<tr><th>table_heads</th>
<th>table_heads</th>

</tr>
</thead>
<tbody>
<?php
$sql=”select * from table_name”;
$result=mysqli_query($con,$sql);
while($row=mysqli_fetch_array($result))
{
?>
<tr>
<td><?php echo $row[‘column_name’];?></td>

<td><?php echo $row[‘column_name’];?></td>
</tr>
<?php
}
?>
</tbody>
</table>
<script type=”text/javascript” charset=”utf8″ src=”http://ajax.aspnetcdn.com/ajax/jQuery/jquery-1.8.2.min.js”></script&gt;
<script type=”text/javascript” charset=”utf8″ src=”http://ajax.aspnetcdn.com/ajax/jquery.dataTables/1.9.4/jquery.dataTables.min.js”></script&gt;
<script type=”text/javascript” charset=”utf-8″ src=”media/js/ZeroClipboard.js”></script>
<script type=”text/javascript” charset=”utf-8″ src=”media/js/TableTools.js”></script>
<script type=”text/javascript” charset=”utf-8″>
$(document).ready( function () {
$(‘#example’).dataTable( {
“aaSorting”: [[ 4, “desc” ]],
“bJQueryUI”: true,
“sPaginationType”: “full_numbers”,
“sDom”: ‘<“H”Tfr>t<“F”ip>’,
“oTableTools”: {
“aButtons”: [
“copy”, “csv”, “xls”, “pdf”,
{
“sExtends”:    “collection”,
“sButtonText”: “Save”,
“aButtons”:    [ “csv”, “xls”, “pdf” ]
}
]
}
} );
} );
</script>
</body>
</html>
Sending e-mails with PHP and PHPemailer

The Following code will send email using the Google SMTP server. Replace your gmail ID and your password to using this code. Also Download you own phpmailer class from here. Download the class file and put it on the same folder

mail.php

—————

<html>
<head>
<title>PHPMailer – SMTP (Gmail) advanced test</title>
</head>
<body>

<?php
require_once(‘../class.phpmailer.php’);
//include(“class.smtp.php”); // optional, gets called from within class.phpmailer.php if not already loaded

$mail = new PHPMailer(true); // the true param means it will throw exceptions on errors, which we need to catch

$mail->IsSMTP(); // telling the class to use SMTP

try {
$mail->Host       = “mail.yourdomain.com”; // SMTP server
$mail->SMTPDebug  = 2;                     // enables SMTP debug information (for testing)
$mail->SMTPAuth   = true;                  // enable SMTP authentication
$mail->SMTPSecure = “ssl”;                 // sets the prefix to the servier
$mail->Host       = “smtp.gmail.com”;      // sets GMAIL as the SMTP server
$mail->Port       = 465;                   // set the SMTP port for the GMAIL server
$mail->Username   = “t.mahesmca@gmail.com”;  // GMAIL username
$mail->Password   = “*****************”;            // GMAIL password
$mail->AddAddress(‘t.mahesmca@gmail.com’, ‘Mahes’);
$mail->SetFrom(‘*******@gmail.com’, ‘First Last’);
$mail->AddReplyTo(‘*******@gmail.com’, ‘First Last’);
$mail->Subject = ‘Type your own suject here’;
$mail->AltBody = ‘To view the message, please use an HTML compatible email viewer!’; // optional – MsgHTML will create an alternate automatically
$mail->MsgHTML(file_get_contents(‘contents.html’));
$mail->AddAttachment(‘images/phpmailer.gif’);      // attachment
$mail->AddAttachment(‘images/phpmailer_mini.gif’); // attachment
$mail->Send();
echo “Message Sent OK</p>\n”;
} catch (phpmailerException $e) {
echo $e->errorMessage(); //Pretty error messages from PHPMailer
} catch (Exception $e) {
echo $e->getMessage(); //Boring error messages from anything else!
}
?>

</body>
</html>

Auto refreshing (div tag or page) Using Jquery when database updated

Here is the code to auto refresh a div tag <div> or a portion of a page Using Jquery.

<html>
<head>
<title>Auto Refresh Div Content Demo | jQuery4u</title>
<!– For ease i’m just using a JQuery version hosted by JQuery- you can download any version and link to it locally –>
<script src=”http://code.jquery.com/jquery-latest.js”></script&gt;
<script>
(function($)
{
    $(document).ready(function()
    {
        $.ajaxSetup(
        {
            cache: false,
            beforeSend: function() {
                $(‘#content’).show();
                $(‘#loading’).hide();
            },
            complete: function() {
                $(‘#loading’).hide();
                $(‘#content’).show();
            },
            success: function() {
                $(‘#loading’).hide();
                $(‘#content’).show();
            }
        });
        var $container = $(“#content”);
        $container.load(“display.php”);
        var refreshId = setInterval(function()
        {
            $container.load(‘display.php’);
        }, 9000);
    });
})(jQuery);
</script>
</head>
<body>

<div id=”wrapper”>
    <div id=”content”></div>
</div>
</body>

</html>

here diplay.php is an page where i read data’s from my database using mysqli

Hope this helped you For more details comment your questions.

How to create responsive webpage OR website with Twitter Bootstrap

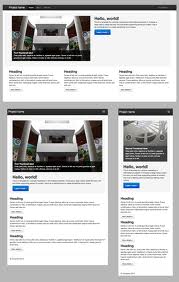
imagesWe will take the in consideration and try to understand the nuances of how this ‘Responsive Design’ stuff is achieved. But before that, you must know that you have to ad the following line within head section of your webpage:

<meta name=”viewport” content=”width=device-width, initial-scale=1.0″>  

The view port meta tag, as it is commonly called as, overrides the default viewport and helps to load the style related to the specific viewport.

width property sets the width of the screen. It may contain a value like 320, denoting 320 pixels or may have the value ‘device-width’ which tells the browser to use the native resolution(or width you may say for simplicity) of the device.

initial-scale property is the initial scale of the viewport as a multiplier. So, when set to 1.0, it represents the native width of the device in question.

And of course, after that you must add the responsive CSS of Twitter Bootstrap like following:

<link href=”assets/css/bootstrap-responsive.css” rel=”stylesheet”> 

Now, if you look at the responsive CSS file, you would find that after declaring some general stuff (from line number 10 to 22), there are various sections starting with ‘@media’. And this is how styles for various device sizes are written.

The first of this sections starts with ‘@media (max-width: 480px)‘, which sets styles for devices whose maximum width is 480 pixels.

The second section starts with ‘@media (max-width: 767px)‘, which sets styles for devices whose maximum width is 767 pixels.

The third section starts with ‘@media (min-width: 768px) and (max-width: 979px)‘, which sets styles for devices whose minimum width is 768 pixels and maximum width is 979 pixels.

The next section is for devices with maximum width of 979 pixels. So, it starts with ‘@media (max-width: 979px)‘.

Last two sections starts with ‘@media (min-width: 980px)’ and ‘@media (min-width: 1200px)‘; so the first one is for devices with minimum width 980 pixels and 1200 pixels.

So, what basically this style sheet does is, storing styles according to minimum and maximum widths of the devices using ‘min-width‘ and ‘max-width‘ properties.

A little explanation

To make the layout responsive, Twitter Bootstrap does these three things :

1. It modifies the width of the column in the grid.

2. Whenever required, it uses stack element instead of float. if you are not very much clear about what is this stack element stuff, then the following form w3.org may be helpful:

The root element (html) forms the root stacking context. Other stacking contexts are generated by any positioned element (including relatively positioned elements) having a computed value of ‘z-index’ other than ‘auto’. Stacking contexts are not necessarily related to containing blocks.

3. To render headings and text properly, it resizes them when required.

Develop mobile-friendly layouts faster

Twitter Bootstrap has several utility classes for developing mobile-friendly layouts faster. These classes are available on ‘responsive.less’.

.visible-phone, visible on Phones of width 767px and below, hidden on Tablets of 979px to 768px and also hidden on Desktops, which is default.

.visible-tablet, hidden on Phones of width 767px and below, visible on Tablets of 979px to 768px and hidden on Desktops, which is default.

.visible-desktop, hidden on Phones of width 767px and below, hidden on Tablets of 979px to 768px and visible on Desktops, which is default.

.hidden-phone, hidden on Phones of width 767px and below, visible on Tablets of 979px to 768px and visible on Desktops, which is default.

.hidden-tablet, visible on Phones of width 767px and below, hidden on Tablets of 979px to 768px and visible on Desktops, which is default.

.hidden-desktop, visible on Phones of width 767px and below, visible on Tablets of 979px to 768px and hidden on Desktops, which is default.

How to install Magento Connect Theme

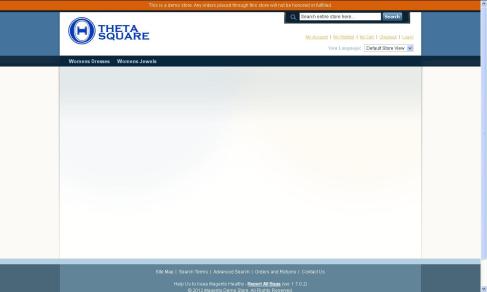
Hi here we are going to do a theme change for our magento default theme which would look like the following pic exclude the header section.

Image

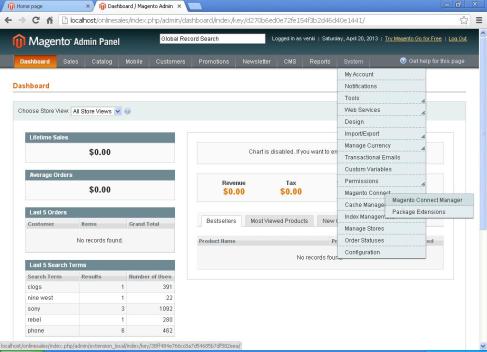
now login to your admin panel

Image

And go to Magento connect manager

Image

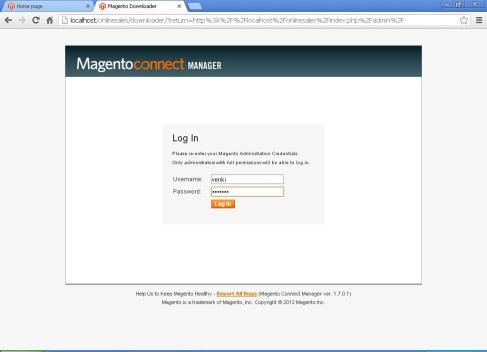
Magento again ask you to login . use your same username and password and login.

Image

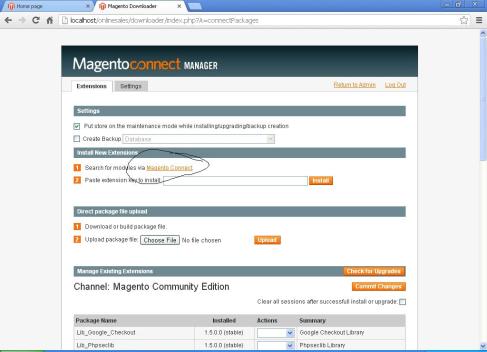
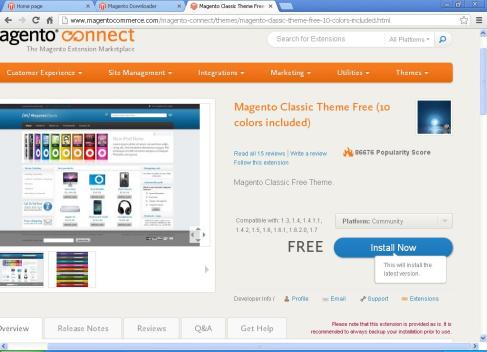
Click Magento connect to go that website

Image

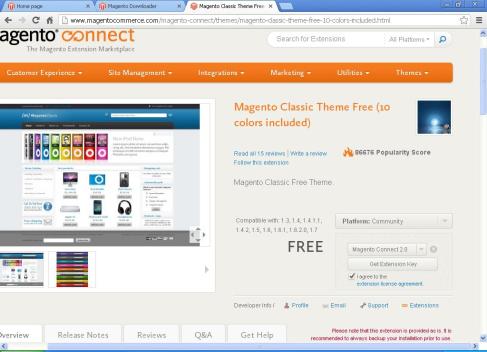
Choose Your theme and click install now agree the terms and condition and copy the key provided by magento connect.Image

Image

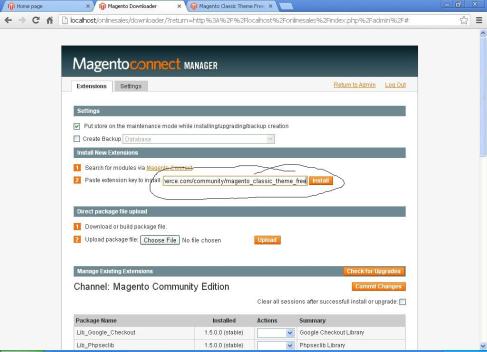
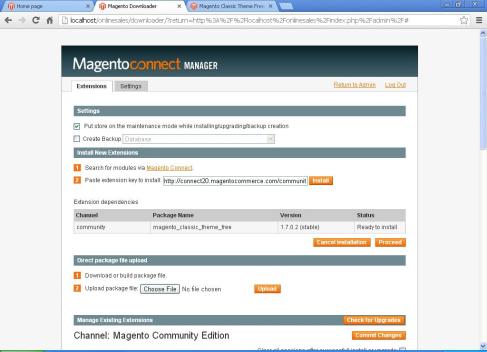
And paste it in the test box as shown bleowImageImage

Click proceed to continue.

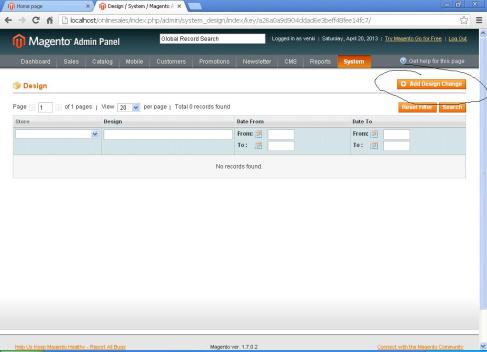
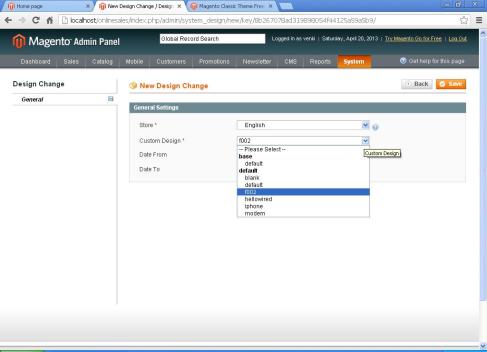
Then go to system>Design

Image

Image

choose your theme as shown above

then refresh your home page you can see the theme change as below .. if you are working on a server directly be patient for some time it may take some time to change

Image

Thank you and hope this may help you .

Cake PHP tutorial

Cake-logo

Installation

In this tutorial we are all going to to know how to install CakePHP .CakePHP is fast and easy to install. The minimum requirements are a webserver and a copy of Cake, that’s all!!!


Requirements

  • HTTP Server. For example: Apache. mod_rewrite is preferred, but by no means required.
  • PHP 5.2.8 or greater.

Technically a database engine isn’t required, but we imagine that most applications will utilize one. CakePHP supports a variety of database storage engines:

  • MySQL (4 or greater)
  • PostgreSQL
  • Microsoft SQL Server
  • SQLite

Downloading CakePHP

There are two main ways to get a fresh copy of CakePHP. You can either download an archive copy (zip/tar.gz/tar.bz2) from the main website, or check out the code from the git repository.

To download the latest major release of CakePHP. Visit the main website http://cakephp.org and follow the “Download Now” link.

All current releases of CakePHP are hosted on Github. Github houses both CakePHP itself as well as many other plugins for CakePHP. The CakePHP releases are available at Github tags.

Alternatively you can get fresh off the press code, with all the bug-fixes and up to the minute enhancements. These can be accessed from github by cloning the Github repository:

git clone git://github.com/cakephp/cakephp.git


Permissions

CakePHP uses the app/tmp directory for a number of different operations. Model descriptions, cached views, and session information are just a few examples.

As such, make sure the directory app/tmp and all its subdirectories in your cake installation are writable by the web server user.

Setup

Setting up CakePHP can be as simple as slapping it in your web server’s document root, or as complex and flexible as you wish. This section will cover the three main installation types for CakePHP: development, production, and advanced.

  • Development: easy to get going, URLs for the application include the CakePHP installation directory name, and less secure.
  • Production: Requires the ability to configure the web server’s document root, clean URLs, very secure.
  • Advanced: With some configuration, allows you to place key CakePHP directories in different parts of the filesystem, possibly sharing a single CakePHP core library folder amongst many CakePHP applications.

Development

A development installation is the fastest method to setup Cake. This example will help you install a CakePHP application and make it available at http://www.example.com/cake_2_0/. We assume for the purposes of this example that your document root is set to /var/www/html.

Unpack the contents of the Cake archive into /var/www/html. You now have a folder in your document root named after the release you’ve downloaded (e.g. cake_2.0.0). Rename this folder to cake_2_0. Your development setup will look like this on the file system:

/var/www/html/
    cake_2_0/
        app/
        lib/
        plugins/
        vendors/
        .htaccess
        index.php
        README

Using one CakePHP checkout for multiple applications

If you are developing a number of applications, it often makes sense to have them share the same CakePHP core checkout. There are a few ways in which you can accomplish this. Often the easiest is to use PHP’s include_path. To start off, clone CakePHP into a directory. For this example, we’ll use ~/projects:

git clone git://github.com/cakephp/cakephp.git ~/projects/cakephp


This will clone CakePHP into your ~/projects directory. If you don’t want to use git, you can download a zipball and the remaining steps will be the same. Next you’ll have to locate and modify your php.ini. On *nix systems this is often in /etc/php.ini, but using php -i and looking for ‘Loaded Configuration File’. Once you’ve found the correct ini file, modify the include_path configuration to include ~/projects/cakephp/lib. An example would look like:

include_path = .:/home/mark/projects/cakephp/lib:/usr/local/php/lib/php

After restarting your webserver, you should see the changes reflected in phpinfo().

Note

If you are on windows, separate include paths with ; instead of :

Having finished setting up your include_path your applications should be able to find CakePHP automatically.

In my next tutorial you will came to know how to install CakePHP by production —à

Import Gmail Contacts using PHP- Google OAuth

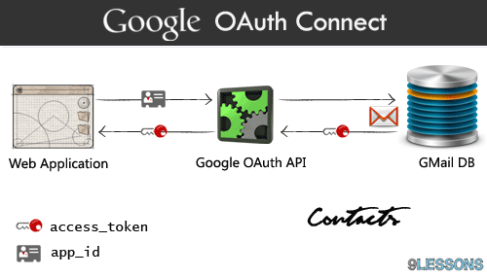
Inviting friends is the most important part of the web project success. This post explains you how to import Gmail contacts from address book via Google open authorization protocol connect with PHP. It’s simple just few configurations follow below four steps, use this script and give option to invite more friends.

Image

Click Here for Live Demo

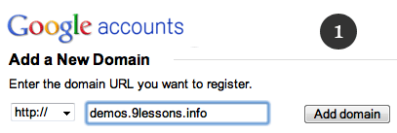
Step 1

Add or register your domain at click here.

Image

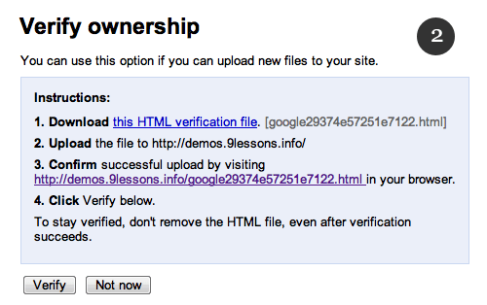
Step 2

Verify your domain ownership with HTML file upload or including META tag.

Image

Step 3

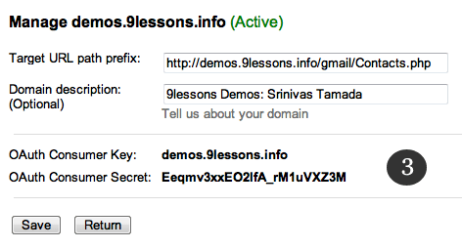
Google will provide you OAuth consumer key and OAuth consumer secret key.

Image

Step 4

Config.php
You have to change Oauth keys and return URL.

<?php
$consumer_key=’demos.9lessons.info’;
$consumer_secret=’Eeqmv3xxEO2lfA_rM1uVXZ3M’;
$callback=’http://demos.9lessons.info/gmail/Contacts.php&#8217;;
$emails_count=’500′; // max-results
?>
GmailConnect.php
Contains PHP code. Connecting to Google for requesting open authentication access tokens.
<?php
include_once ‘GmailOath.php’;
include_once ‘Config.php’;
session_start();
$oauth =new GmailOath($consumer_key, $consumer_secret, $argarray, $debug, $callback);
$getcontact=new GmailGetContacts();
$access_token=$getcontact->get_request_token($oauth, false, true, true);
$_SESSION[‘oauth_token’]=$access_token[‘oauth_token’];
$_SESSION[‘oauth_token_secret’]=$access_token[‘oauth_token_secret’];
?><a href=”https://www.google.com/accounts/OAuthAuthorizeToken?oauth_token=<?php echo $oauth->rfc3986_decode($access_token[‘oauth_token’]) ?>“>
<img src=’Googleconnect.png’/>
</a>

Contacts.php
Google return to Contact.php file with contacts data.
<?php
include_once ‘GmailOath.php’;
include_once ‘Config.php’;
session_start();
$oauth =new GmailOath($consumer_key, $consumer_secret, $argarray, $debug, $callback);
$getcontact_access=new GmailGetContacts();
$request_token=$oauth->rfc3986_decode($_GET[‘oauth_token’]);
$request_token_secret=$oauth->rfc3986_decode($_SESSION[‘oauth_token_secret’]);
$oauth_verifier= $oauth->rfc3986_decode($_GET[‘oauth_verifier’]);
$contact_access = $getcontact_access->get_access_token($oauth,$request_token, $request_token_secret,$oauth_verifier, false, true, true);
$access_token=$oauth->rfc3986_decode($contact_access[‘oauth_token’]);
$access_token_secret=$oauth->rfc3986_decode($contact_access[‘oauth_token_secret’]);
$contacts= $getcontact_access->GetContacts($oauth, $access_token, $access_token_secret, false, true,$emails_count);//Email Contacts
foreach($contacts as $k => $a)
{
$final = end($contacts[$k]);
foreach($final as $email)
{
echo $email[“address”] .”<br />”;
}
}?>

Embedding user media using HTML5 and gUM

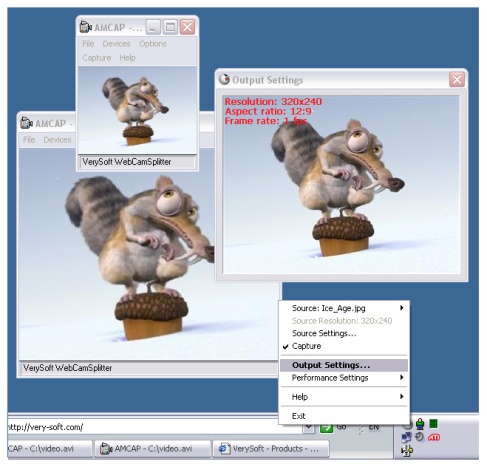
This blog is about how can we read the usermedia like webcam,microphone… using HTML5 gUM

Unlike many of the APIs that are erroneously called “HTML5”, there’s an excuse with getUserMedia – it started life as the HTML5 <device> element before becoming renamed and then hived off to the W3C’s WebRTC suite of specifications.

gUM (as we shall now call it) allows access to a user’s camera and microphone. I mentioned that it’s part of the webRTC suite of specifications, which will enable peer-to-peer in-browser video conferencing. As gUM has other uses, too, it’s separated out.

Camera access is implemented in Opera 12 final on Android, in Opera Desktop Labs and in Google Chrome Canary builds. Neither Opera nor Chrome yet implements microphone access.

The specification is still being worked on, so Opera and Webkit have different syntaxes, but a small JavaScript snippet called The gUM Shield can normalise those –Thanks to getUserMedia.

Once video is streaming from the device, it can be made the source of a <video> element, which can be positioned off-screen if necessary, and then copied into <canvas> and manipulated as required. Paul Neave’s HTML5 webcam toy copies the streaming data into WebGL in order to manipulate it .

gUM goes a long way to giving web apps the same functionality as native apps. Trying Neave’s gUM and WebGL demo on Opera Mobile 12 feels as responsive and snappy as platform-specific apps. As the functionality becomes widespread in production browsers, I predict lots of web-based QR code-readers and augmented reality apps.Image

HTML 5 Video tag tutorail

HTML 5 tutorail for beginners

<!DOCTYPE HTML>
<html>
<body>

<video width=”320″ height=”240″ controls>
<source src=”movie.mp4″ type=”video/mp4″>
<source src=”movie.ogg” type=”video/ogg”>
Your browser does not support the video tag.
</video>

</body>
</html>

The <!DOCTYPE> declaration is not an HTML tag; it is an instruction to the web browser about what version of HTML the page is written in.

To show video in our website we don’t want to do anything complex, the only thing we want to do it to add the video tag. As shown in the above code and give the name of your video in the src parameter that’s all now you got your video in the web page.

Types of Video supported by <video> are

  • Mp4
  • Ogg
  • webM

Attribute Used in <video> tages are:

Attribute Value Description
autoplay autoplay Specifies that the video will start playing as soon as it is ready
controls controls Specifies that video controls should be displayed (such as a play/pause button etc).
height pixels Sets the height of the video player
loop loop Specifies that the video will start over again, every time it is finished
muted muted Specifies that the audio output of the video should be muted
poster URL Specifies an image to be shown while the video is downloading, or until the user hits the play button
preload auto
metadata
none
Specifies if and how the author thinks the video should be loaded when the page loads
src URL Specifies the URL of the video file
width pixels Sets the width of the video player

Compare two dates with Bootstrap datetime picker / Date time picer validation with bootstrap

<!DOCTYPE html>
<html lang=”en”>
<head>
<meta charset=”utf-8″>
<title>Datepicker for Bootstrap, from Twitter</title>
<link href=”css/bootstrap.css” rel=”stylesheet”>
<link href=”css/datepicker.css” rel=”stylesheet”>
<style>
.container {
background: #fff;
}
#alert {
display: none;
}
</style>
<link href=”js/google-code-prettify/prettify.css” rel=”stylesheet”>
<!– Le HTML5 shim, for IE6-8 support of HTML elements –>
<!–[if lt IE 9]>
<script src=”http://html5shim.googlecode.com/svn/trunk/html5.js”></script&gt;
<![endif]–>
</head>

<body>
<div>

<p>Attached to other elment then field and using events to work with the date values.</p>
<div>

<div id=”alert”>
<strong>Oh snap!</strong>
</div>
<table>
<thead>
<tr>
<th>Start date<a href=”#” id=”dp4″ data-date-format=”yyyy-mm-dd” data-date=”2012-02-20″>Change</a></th>
<th>End date<a href=”#” id=”dp5″ data-date-format=”yyyy-mm-dd” data-date=”2012-02-25″>Change</a></th>
</tr>
</thead>
<tbody>
<tr>
<td id=”startDate”>2012-02-20</td>
<td id=”endDate”>2012-02-25</td>
</tr>
</tbody>
</table>
</div>
</div>
</div>
</section>
</div>
<script src=”js/google-code-prettify/prettify.js”></script>
<script src=”js/jquery.js”></script>
<script src=”js/bootstrap-datepicker.js”></script>
<script>
$(function(){
window.prettyPrint && prettyPrint();
$(‘#dp1’).datepicker({
format: ‘mm-dd-yyyy’
});
$(‘#dp2’).datepicker();
$(‘#dp3’).datepicker();
$(‘#dpYears’).datepicker();
$(‘#dpMonths’).datepicker();

var startDate = new Date(2012,1,20);
var endDate = new Date(2012,1,25);
$(‘#dp4’).datepicker()
.on(‘changeDate’, function(ev){
if (ev.date.valueOf() > endDate.valueOf()){
$(‘#alert’).show().find(‘strong’).text(‘The start date can not be greater then the end date’);
} else {
$(‘#alert’).hide();
startDate = new Date(ev.date);
$(‘#startDate’).text($(‘#dp4’).data(‘date’));
}
$(‘#dp4’).datepicker(‘hide’);
});
$(‘#dp5’).datepicker()
.on(‘changeDate’, function(ev){
if (ev.date.valueOf() < startDate.valueOf()){
$(‘#alert’).show().find(‘strong’).text(‘The end date can not be less then the start date’);
} else {
$(‘#alert’).hide();
endDate = new Date(ev.date);
$(‘#endDate’).text($(‘#dp5’).data(‘date’));
}
$(‘#dp5’).datepicker(‘hide’);
});

// disabling dates
var nowTemp = new Date();
var now = new Date(nowTemp.getFullYear(), nowTemp.getMonth(), nowTemp.getDate(), 0, 0, 0, 0);

var checkin = $(‘#dpd1’).datepicker({
onRender: function(date) {
return date.valueOf() < now.valueOf() ? ‘disabled’ : ”;
}
}).on(‘changeDate’, function(ev) {
if (ev.date.valueOf() > checkout.date.valueOf()) {
var newDate = new Date(ev.date)
newDate.setDate(newDate.getDate() + 1);
checkout.setValue(newDate);
}
checkin.hide();
$(‘#dpd2’)[0].focus();
}).data(‘datepicker’);
var checkout = $(‘#dpd2’).datepicker({
onRender: function(date) {
return date.valueOf() <= checkin.date.valueOf() ? ‘disabled’ : ”;
}
}).on(‘changeDate’, function(ev) {
checkout.hide();
}).data(‘datepicker’);
});
</script>
<script src=”http://www.google-analytics.com/urchin.js&#8221; type=”text/javascript”>
</script>
<script type=”text/javascript”>
_uacct = “UA-106117-1”;
urchinTracker();
</script>
</body>
</html>
Note:please download bootstrap and jquery and put in the appropriate css and js folder to work the above code.

This is the out put you will get for the above code.

Image

If you select the second date less than the first it will result in error like the below picture.

Image

Hope this helped to you.